
Thursday, September 4, 2008 11:20 AM
Posted by Tara Morrison, Software QA EngineerAs you may have seen in yesterday's post, the beta version of Picasa 3 offers many improvements and additions to the existing Picasa software. One of the new features I'm most excited about is our powerful retouching tool that can fix things like acne and scratches -- and it's great for restoring old photos.
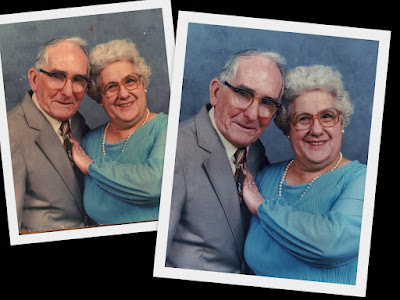
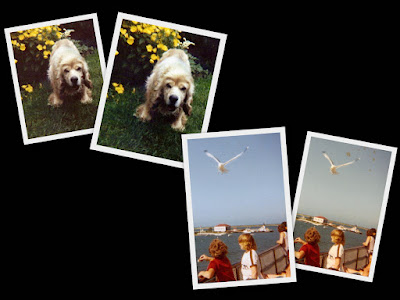
If you've ever scanned decades-old prints, you well know they're not always in the best condition. Our Retouch tool now allows you to remove scratches, marks, and stains. A little bit of Tuning and the 1-click Sharpen Filter are the perfect finishing touches. Then you can order new prints of your old photos. Check out these before and after photos to see the kinds of things you can do:
Here are some tips to help you get started with retouching your photos in Picasa:
If you've ever scanned decades-old prints, you well know they're not always in the best condition. Our Retouch tool now allows you to remove scratches, marks, and stains. A little bit of Tuning and the 1-click Sharpen Filter are the perfect finishing touches. Then you can order new prints of your old photos. Check out these before and after photos to see the kinds of things you can do:


(click to enlarge)
Here are some tips to help you get started with retouching your photos in Picasa:
- Use your mouse wheel to zoom in. Zoom out after retouching each patch to make sure it's blended well. If it's not, just use Undo Patch and try again.
- Zoomed in, particularly on faces, there is a huge range of color tones. When correcting something like acne, you should use a replacement section of skin close to the blemish for the most natural look.
- If you're fixing a large area, it helps to correct gradually instead of in one patch so that the areas all blend well together naturally. Try working on smaller areas, starting at the outside.
- Don't forget texture! It's important to try and follow any existing patterns on the surface you're retouching. If there is a line in the face (that you're not trying to get rid of), it would look unnatural for the line to be broken by a patch of unlined skin. Go back over the corrected area, and replace it with a matching texture. Try this for pores, hair, etc.
- Use plus and minus keys on your keyboard to quickly re-size the brush. Use the slider bar for more precise adjustments.
